Thermal Panels » External Wall Cladding Installation
ROYAL FACADE
ROYAL FACADE Clinker Thermal Panels: External Wall Cladding Installation
Technical solutions album of facade thermal panels ™ROYAL FAСADE with clinker tiles
Instructions for External Wall Cladding
with ROYAL FACADE Clinker Thermal Panels
І. Introduction
Features of the ™ Royal Facade clinker thermal panels installation are that you should strictly follow the provisions of the instruction and the general recommendations of the manufacturer. This also applies to manufacturers of related materials (glue-foam, grouting mixture, quick installation dowel, etc.).
Please note that the warranty extends to Royal Facade products; we are responsible for the integrity of the structure – clinker thermal panel. The decoration team is responsible for the installation.
General recommendations of the manufacturer:
Installation of clinker thermal panels takes place at any time of the year, so do not delay warming the house until the weather is favourable.
Use all-season mounting glue-foam only at ambient temperatures from -10 to +35 degrees Celsius.
Before choosing the grout colour and starting the grouting process, brick up a small corner or section of the thermal panel, wait a few days so that you are sure of your choice.
If the weather for grouting is unfavourable, use acrylic instead of water for dark colours. But before starting work, you SHOULD consult with a specialist of our production regarding the proportions.
For more accurate installation and less waste, use the thermal panel location schemes provided by the manager (if the manufacturer calculated the area).
Before starting the installation, you should check whether there are any deviations on the facade (if any, what exactly), whether there are any protruding elements, and how the gas pipe is installed (whether it will be necessary to carry out any preparatory measures).
7. If you have any questions about installation, in advance or during the process, contact the manufacturer’s specialist: +380987774588, +380667774588.
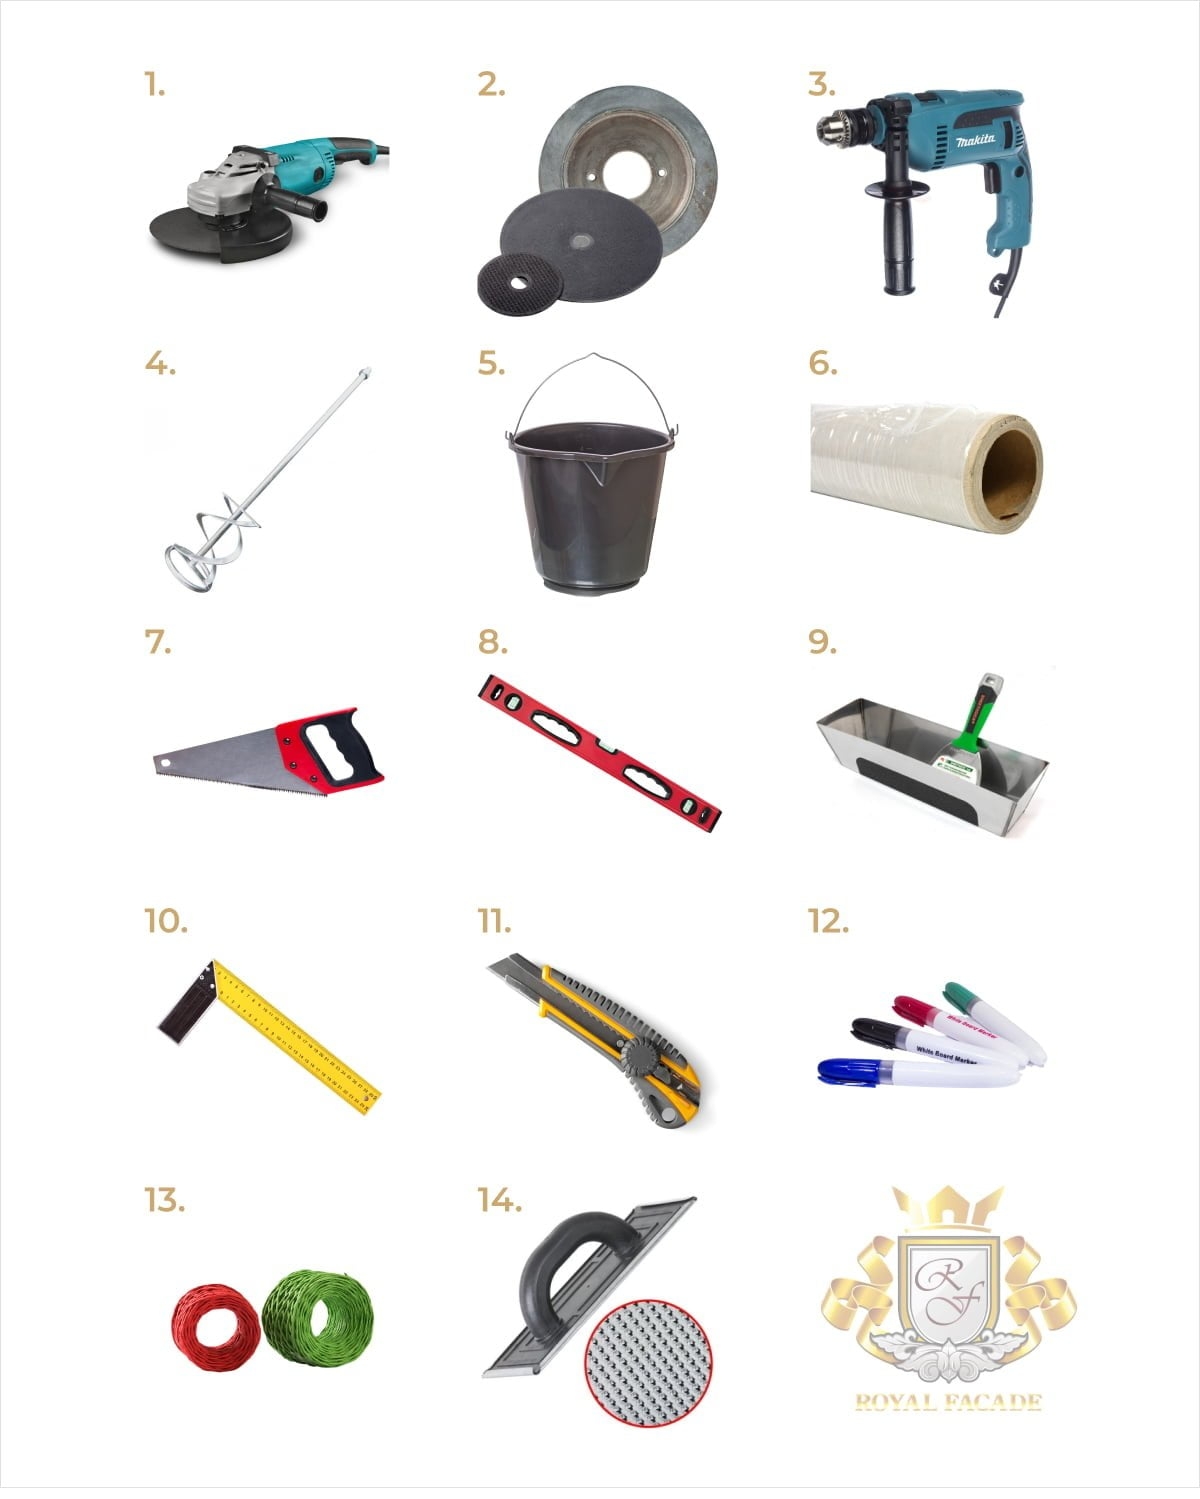
The following tools will be needed to install thermal panels:
- Angle grinder
- Diamond and grinding wheel
- Impact drill
- Whisk
- Buckets
- Polyethylene film
- Wood saw
- Level
- Tray with trowel for grout
- Corner
- Knife
- Marker
- Construction cord
- Grater for levelling foam plastic
II. Technological operations on thermal panels installation
1. The base of the exernal wall should be prepared (according to State Building Regulations В.2.6-22-2001 «Arrangement of coatings using dry construction mixtures») – dry, solid and clean. Deviations due to unevenness should be checked with a 2-3 meters long level.
You should use a construction level (bubble, laser or water).
The level should be applied to the corner of the wall parallel to the horizon; the curvature should be equal to the greatest height of the gaps. And a construction cone balance weight will help measure vertical irregularities (Figure 1).
In order to correctly choose the length of the elements for fastening and calculate the consumption of the adhesive mixture, the curvature of the facade on an area of up to 3 m² should be no more than ±10 mm.
PLEASE NOTE! Clinker thermal panels, which are installed by a professional team or by the owner of the premises, can be previously stored both inside the premises and outside. But you should warn the manufacturer in advance because there are two types of thermal panels delivery: with packaging and without it.
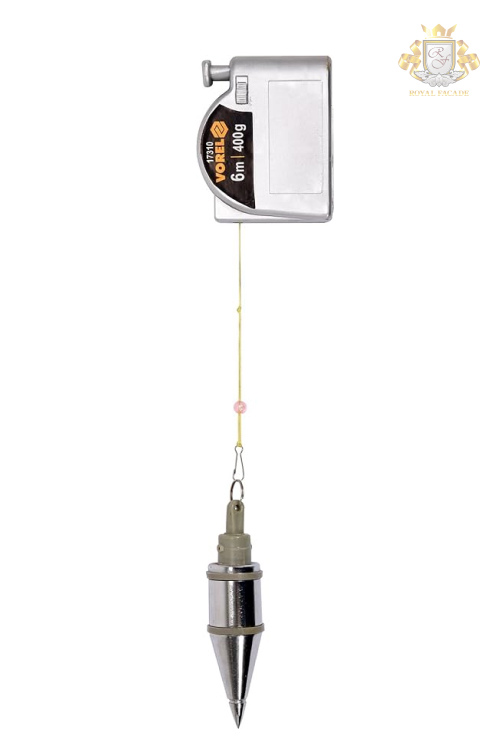
Figure 1. Construction magnetic cone balance weight
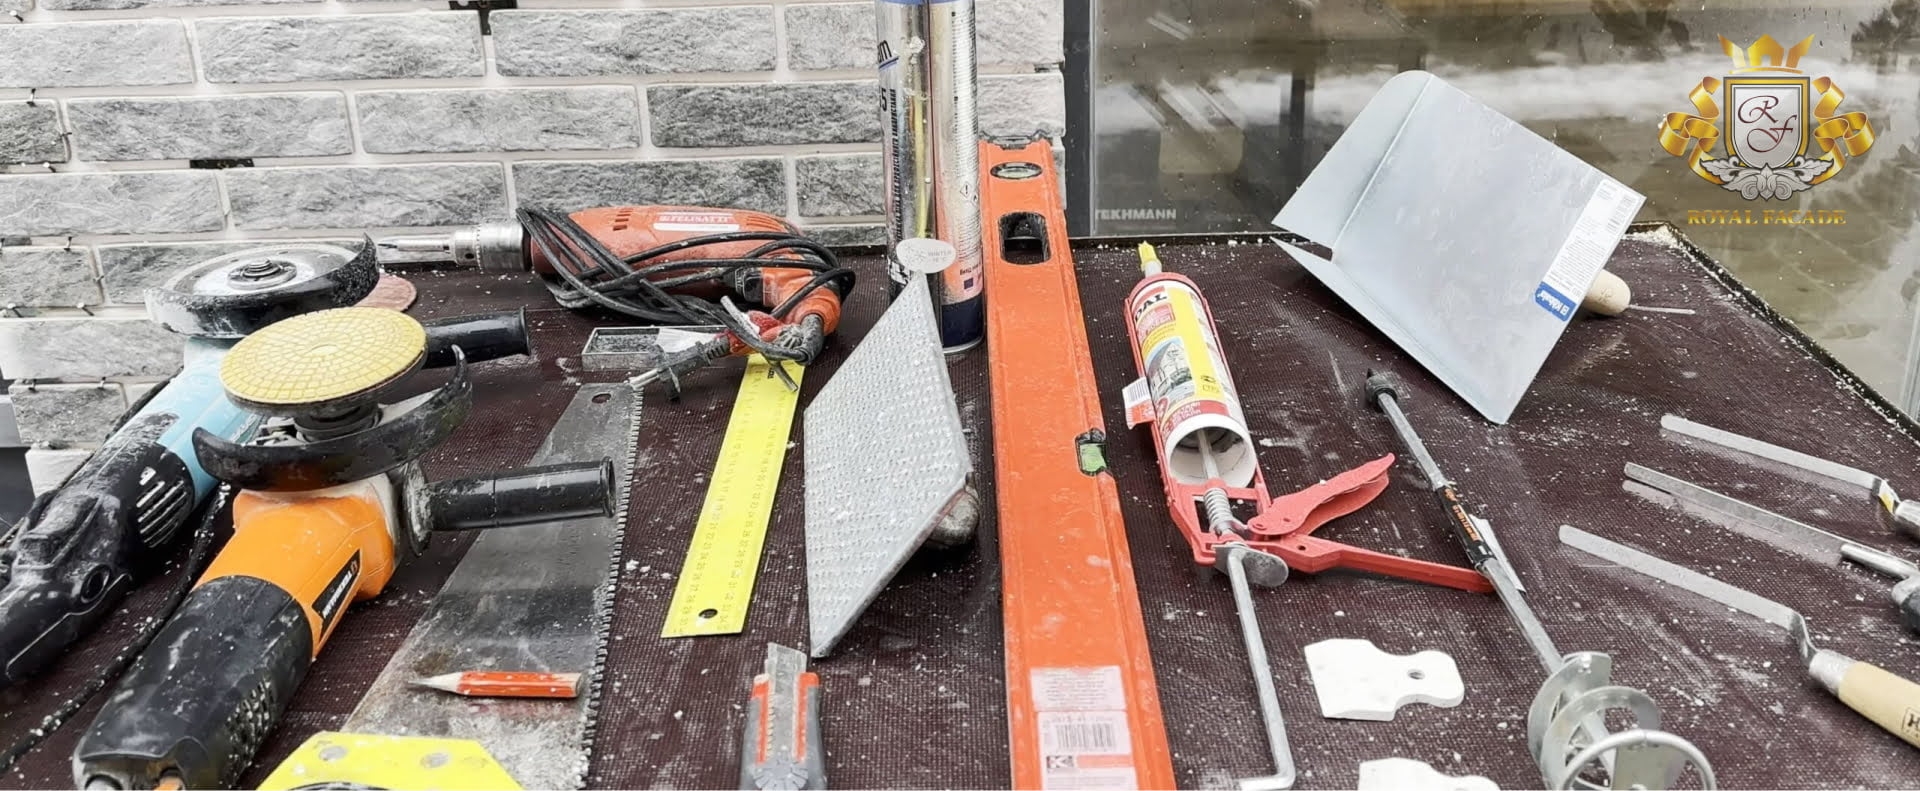
We recommend watching a video instruction for external wall cladding installation:
3. The process of attaching thermal panels is carried out in accordance with the following order:
- Placement of thermal panels;
- Marking;
- Drilling a hole;
- Cleaning the hole;
- Installation of fasteners (different types of fasteners are used);
- Fixation of thermal panels.
4. Grouting (pointing and places of fastening) with a grouting mixture is carried out in accordance with the instruction of the manufacturer of the mixture, as well as following the recommendations of the manufacturer of thermal panels.
PLEASE NOTE! We remind you that during the grouting of thermal panels, you should observe the appropriate weather conditions. If you are unable to read the instruction due to packaging damage, please contact the company manager or download the instruction from this site or watch the video instruction!
The technology of installing thermal panels involves fixing the panels directly to the walls, but the facade should be levelled and padded in advance. No need to use a crate!
ІІІ. Installation of external corners
- Preparation of the wall base (it should be dry, flat and clean). If there are any contaminants, they should be removed (this also applies to bitumen or oil contamination).
- Installation of the corner is carried out in two ways:
• Forming a corner of a wall thermal panel
• Using a ready-made corner element from the manufacturer
Let’s consider both methods in more detail (the drawing can be seen in the Album of Technical Solutions at the link)
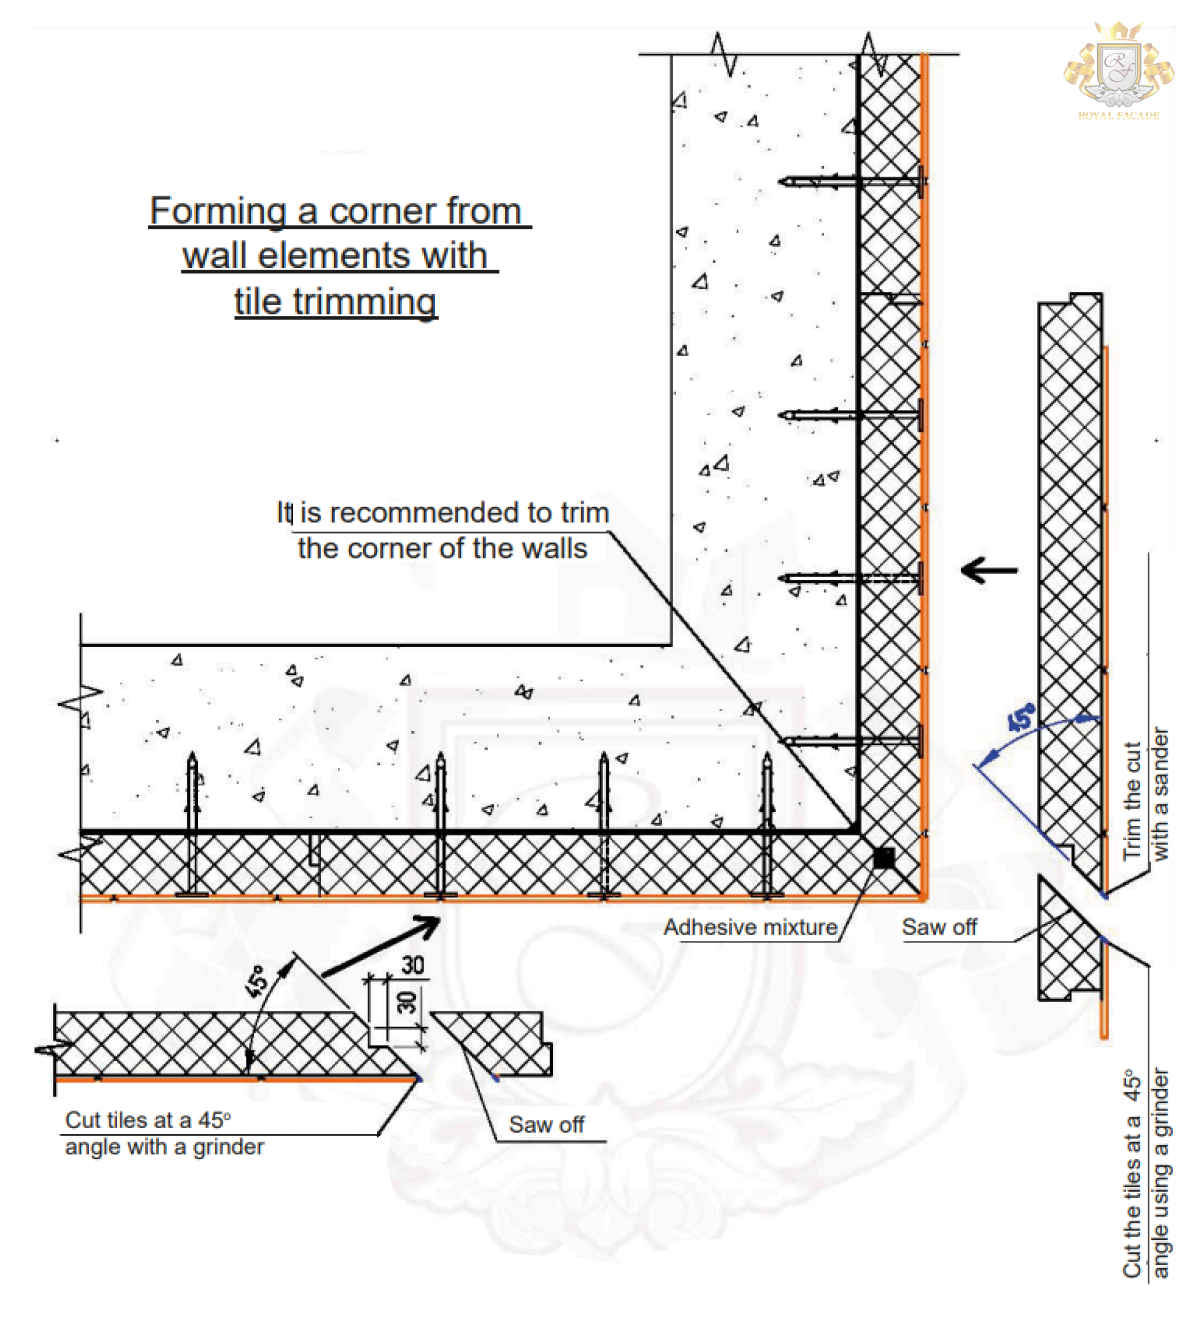
Way 1. Forming a corner of a wall thermal panel.
We form the external corner directly on the construction site (see a video instruction)
- Cutting a wall thermal panel.
Panels are cut on the construction site. In advance, you should measure the parameters of the corner of the building being insulated, as well as determine the geometric features of the facade.
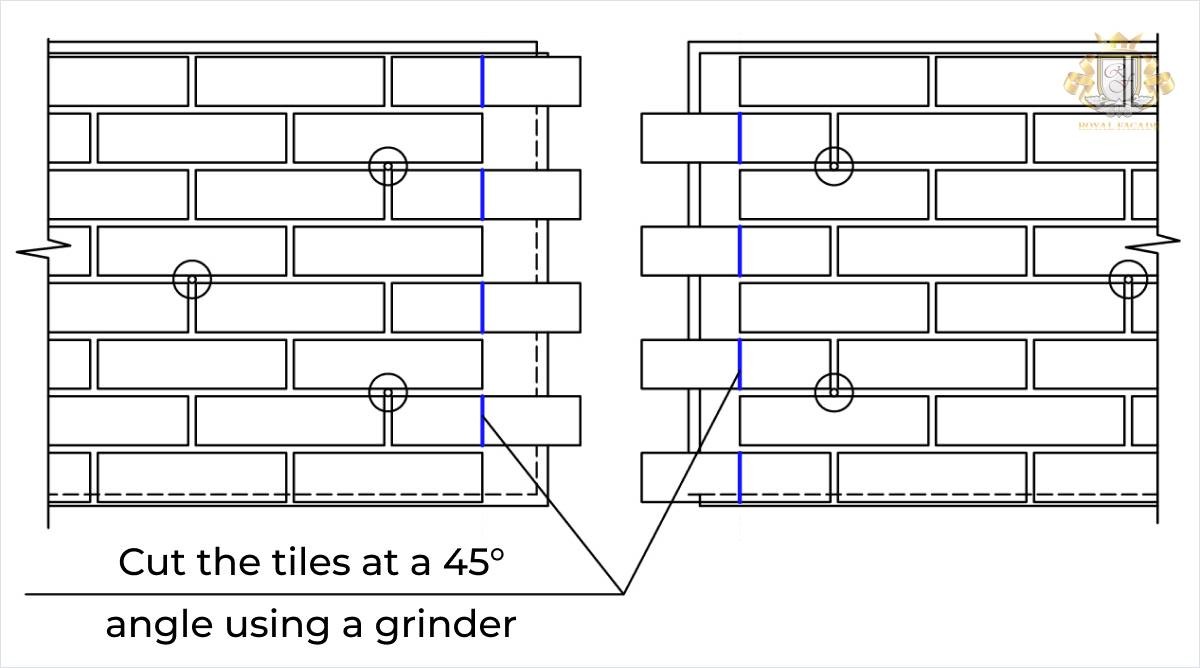
With the help of a construction pencil or marker, we mark and cut the decorative protective layer (tile) with a grinder. - Treat the surface of the walls with the pad.
- Mark the level of the first row of thermal panels using a laser or water level, taking into account the features of the object.
- Fasten the starting galvanized profile at the marked level.
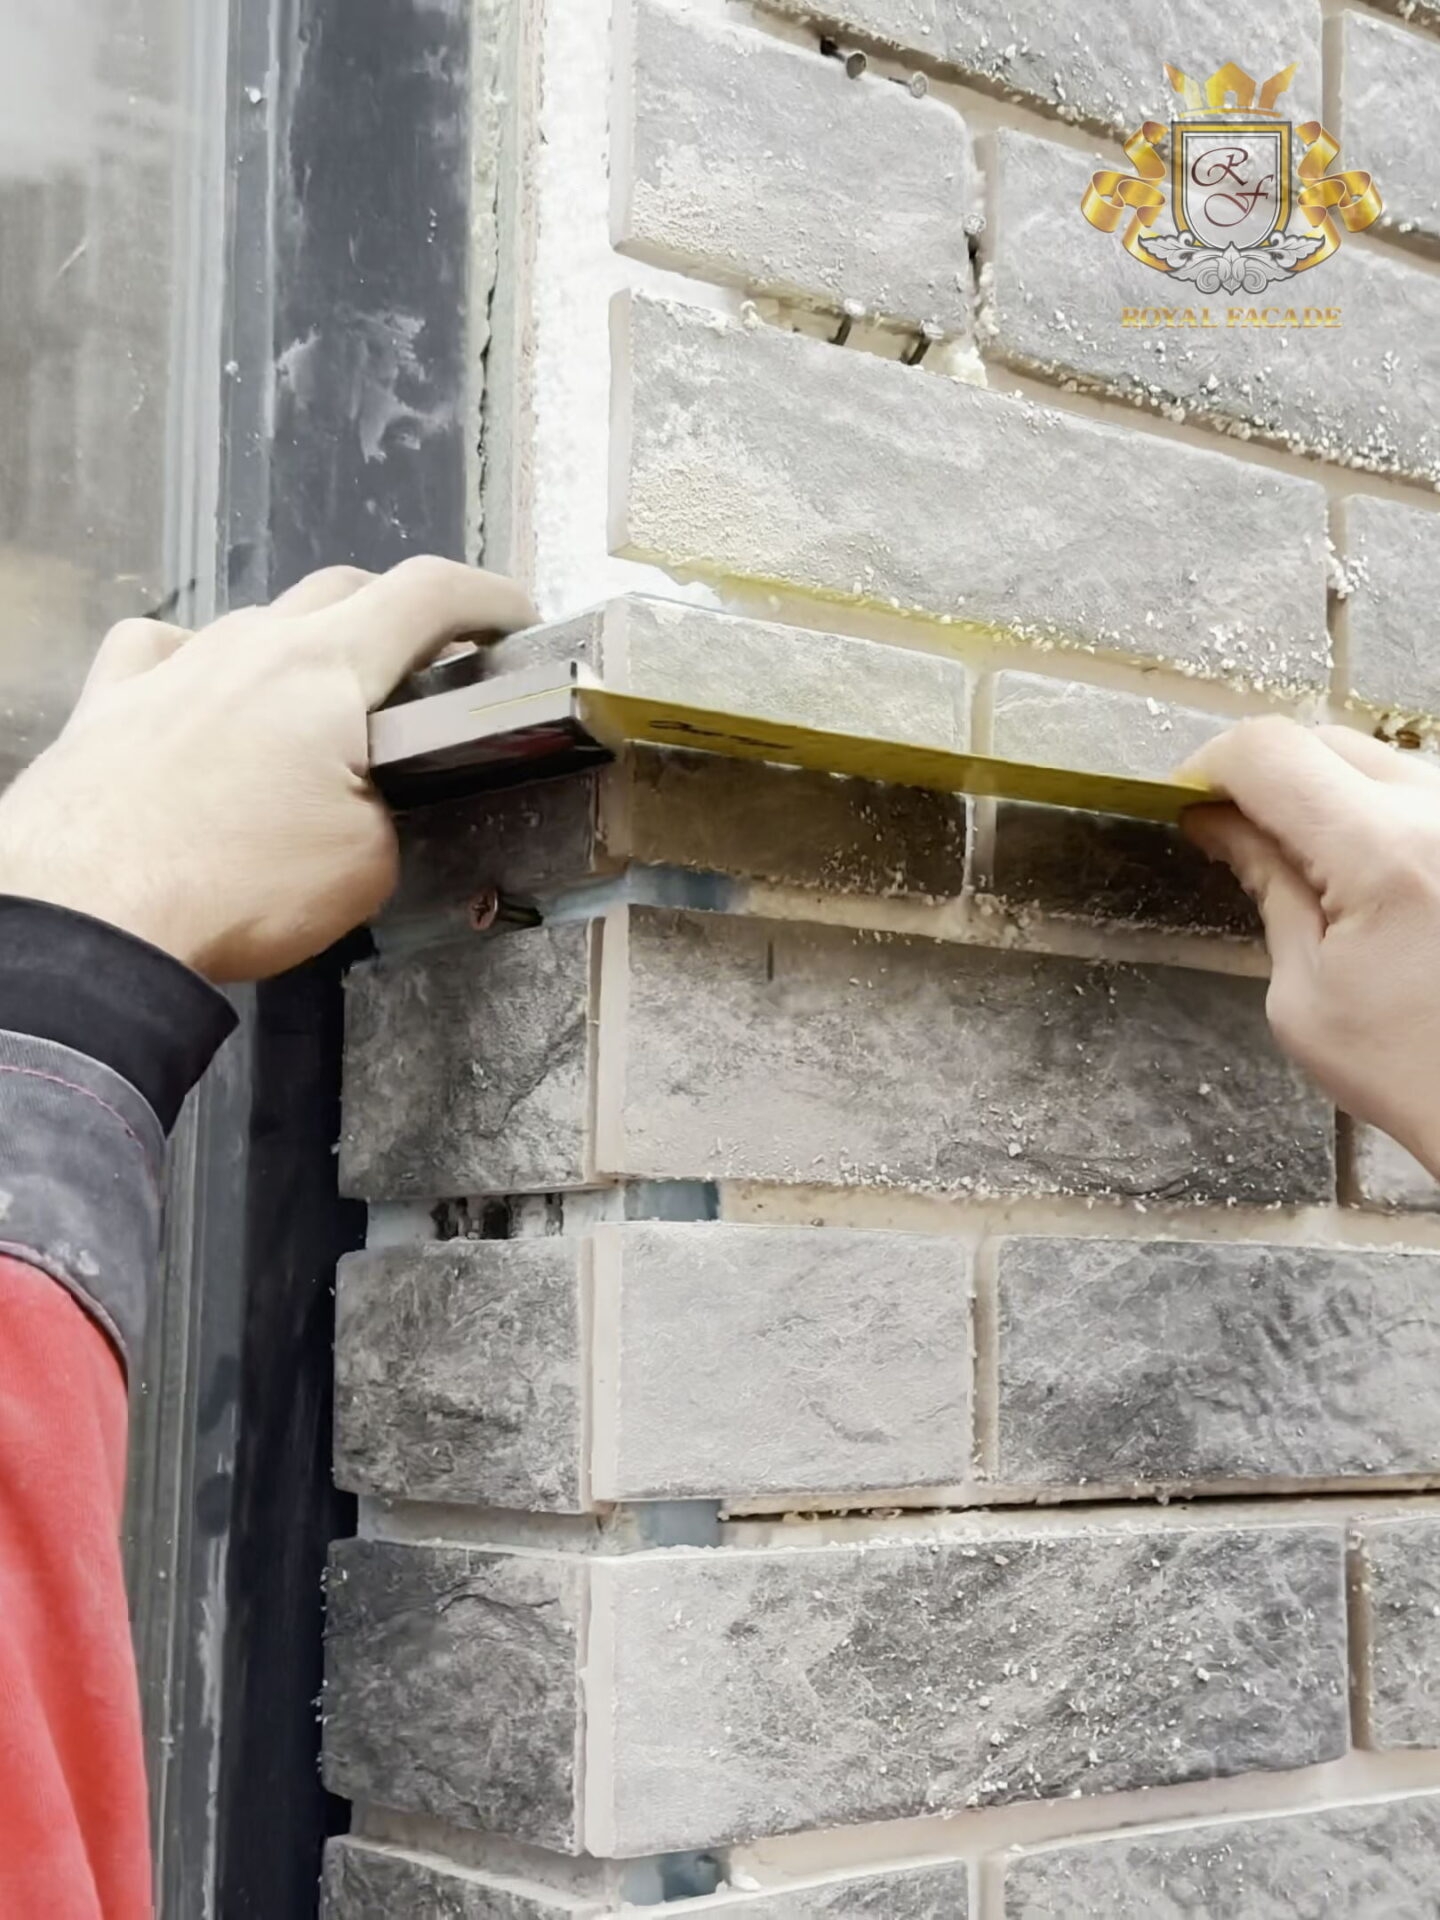
- Installation should be started from an external or internal corner.
- A corner of wall thermal panels is made using a construction knife, a ruler and a hacksaw. You should also set the necessary parameters for the angle using a ruler-angle bar.
- Using an angle grinder with a diamond cutting disc with a diameter of 125 mm and a speed of 10,000-11,000 rpm, make cuts on the tile along the pre-marked lines.
PLEASE NOTE! The use of construction gloves and protective transparent glasses is mandatory!
- Apply glue-foam along the perimeter of the thermal panel (preferably all-season if installing in winter). Indentation from the edge should be not less than 2 cm.
- Form the external corner taking into account the necessary parameters. After grouting the seams, apply a sealant in the colour of the tile or seam to the joint of the tiles.
Video instruction on forming the outer corner of the wall thermal panel
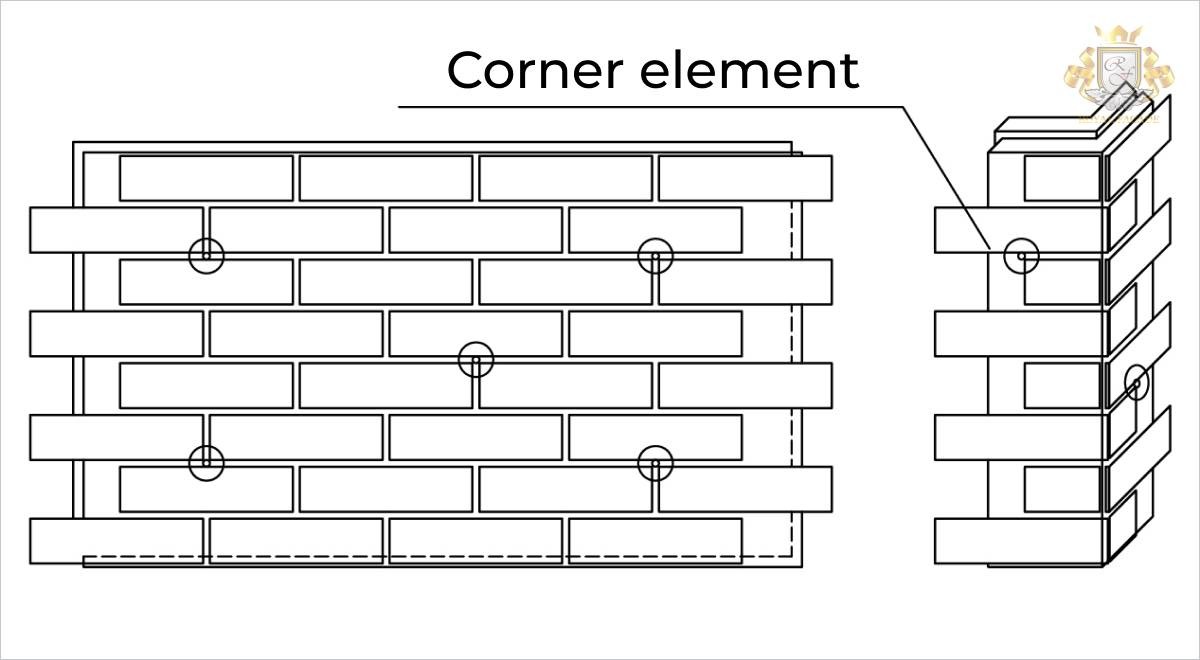
Way 2. Using a ready-made ™ Royal Facade corner element
™ Royal Facade corner element is a monolithic structure made of foamed or extruded polystyrene foam with pressed-in tile cut at 90° or 45°.
- Application of glue-foam on the inner surface of the element. Apply with a gun in a layer of 1.5 cm, leaving at least 50 mm from the edge.
- Press it against the wall, controlling the horizontal and vertical levels, as well as the thickness of the seam between the tiles.
- Recommended consumption of glue-foam is 1 can per 7 m² of facade area. Please note that it is possible to adjust the position of the thermal panel only for 15 minutes (provided the ambient temperature is from -5 to +35° С and the cylinder temperature is not lower than 22° С).
PLEASE NOTE! The cost of installing clinker thermal panels does not include the installation of corner elements, window slopes and other additional work. Therefore, when calculating the price for the installation of thermal panels, you should take into account the full estimate for the insulation of the facade.
- After the glue-foam hardens, the corner element should be mechanically fixed with a quick-installation dowel.
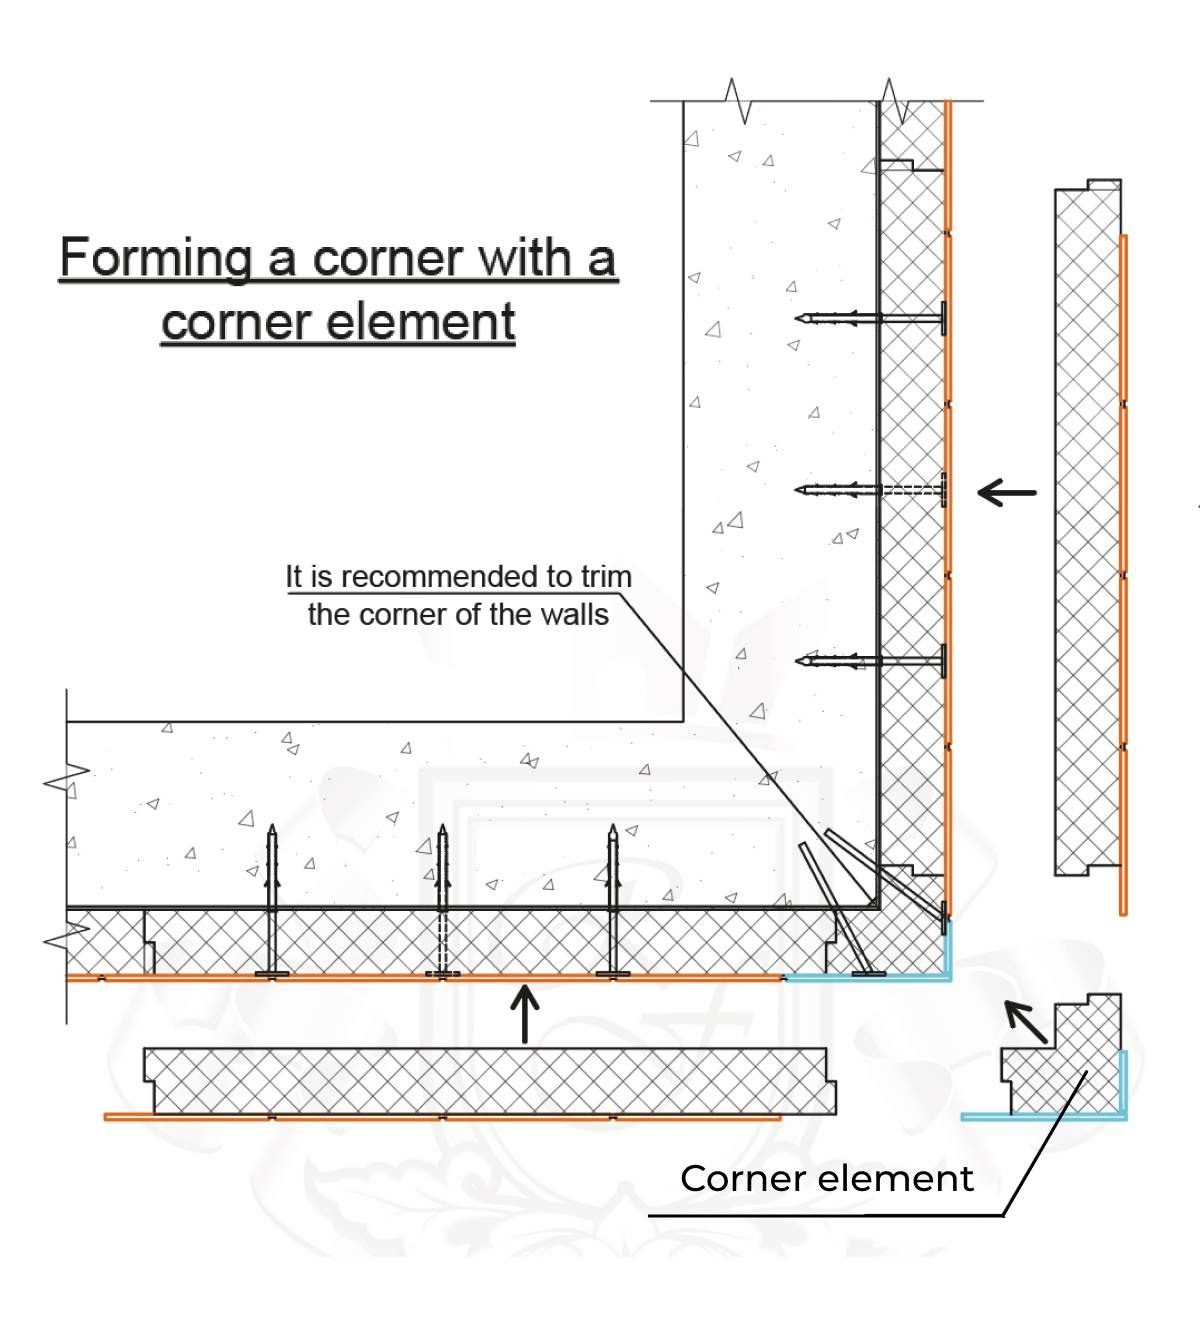
Therefore, it is necessary to install the ™ Royal Facade corner element in compliance with all requirements for the installation of a wall thermal panel.
ІV. Installation of a window slope
Marking of the window slope is carried out taking into account the depth and width of the window opening. The wall thermal panel should be cut taking into account the width of the window slope: make measurements starting from the window profile and ending with the inner part of the facade tile.
At the same time, several important nuances are worth noting:
- If the depth of the window profile does not exceed 125 mm, slopes can be formed using several elements.
- Before applying glue to the foam plastic layer of the window slope, you need to prepare the surface with a foam plastic grater.
- Fastening metalware is carried out taking into account the width of the future tile seam.
Upon completion of all processes, it is necessary to check the geometry of the assembled structure with the help of an angle bar and a level.
V. Fastening elements for thermal panels installation
- Use a quick assembly anchor for concrete, stone and brick
- Use wood self-tapping screw for a wooden facade
- For aerated concrete, it is optimal to use aerated concrete anchors
- Use thrust dowel for porous ceramic block
VІ. Pointing (Grouting) of ™ ROYAL FACADE Clinker Thermal Panels
You should start grouting the seams after installing the front panels (optimally – after the glue dries, that is, 24 hours after the installation is completed), but no later than 30 days after the installation of thermal panels. The temperature range is from +5° С to +30° С, the weather should be dry and preferably overcast.
We recommend that you watch a video tutorial of grouting the seams:
There are two methods of applying the grout mixture:
- with a gun;
- grouting with a semi-dry mixture.
Way 1. Grouting with a semi-dry mixture.
TOOLS FOR WORK:
- An openable trowel
- Optionally, a metal roller is used to perforate the seam (insulation base)
- A brush for removing grout residues
- The area for the mixture
- A water sprayer
- A mixer for kneading
- A bucket
- Water or acrylic in the form of liquid (specify the specifics of mixing with acrylic from the manufacturer)

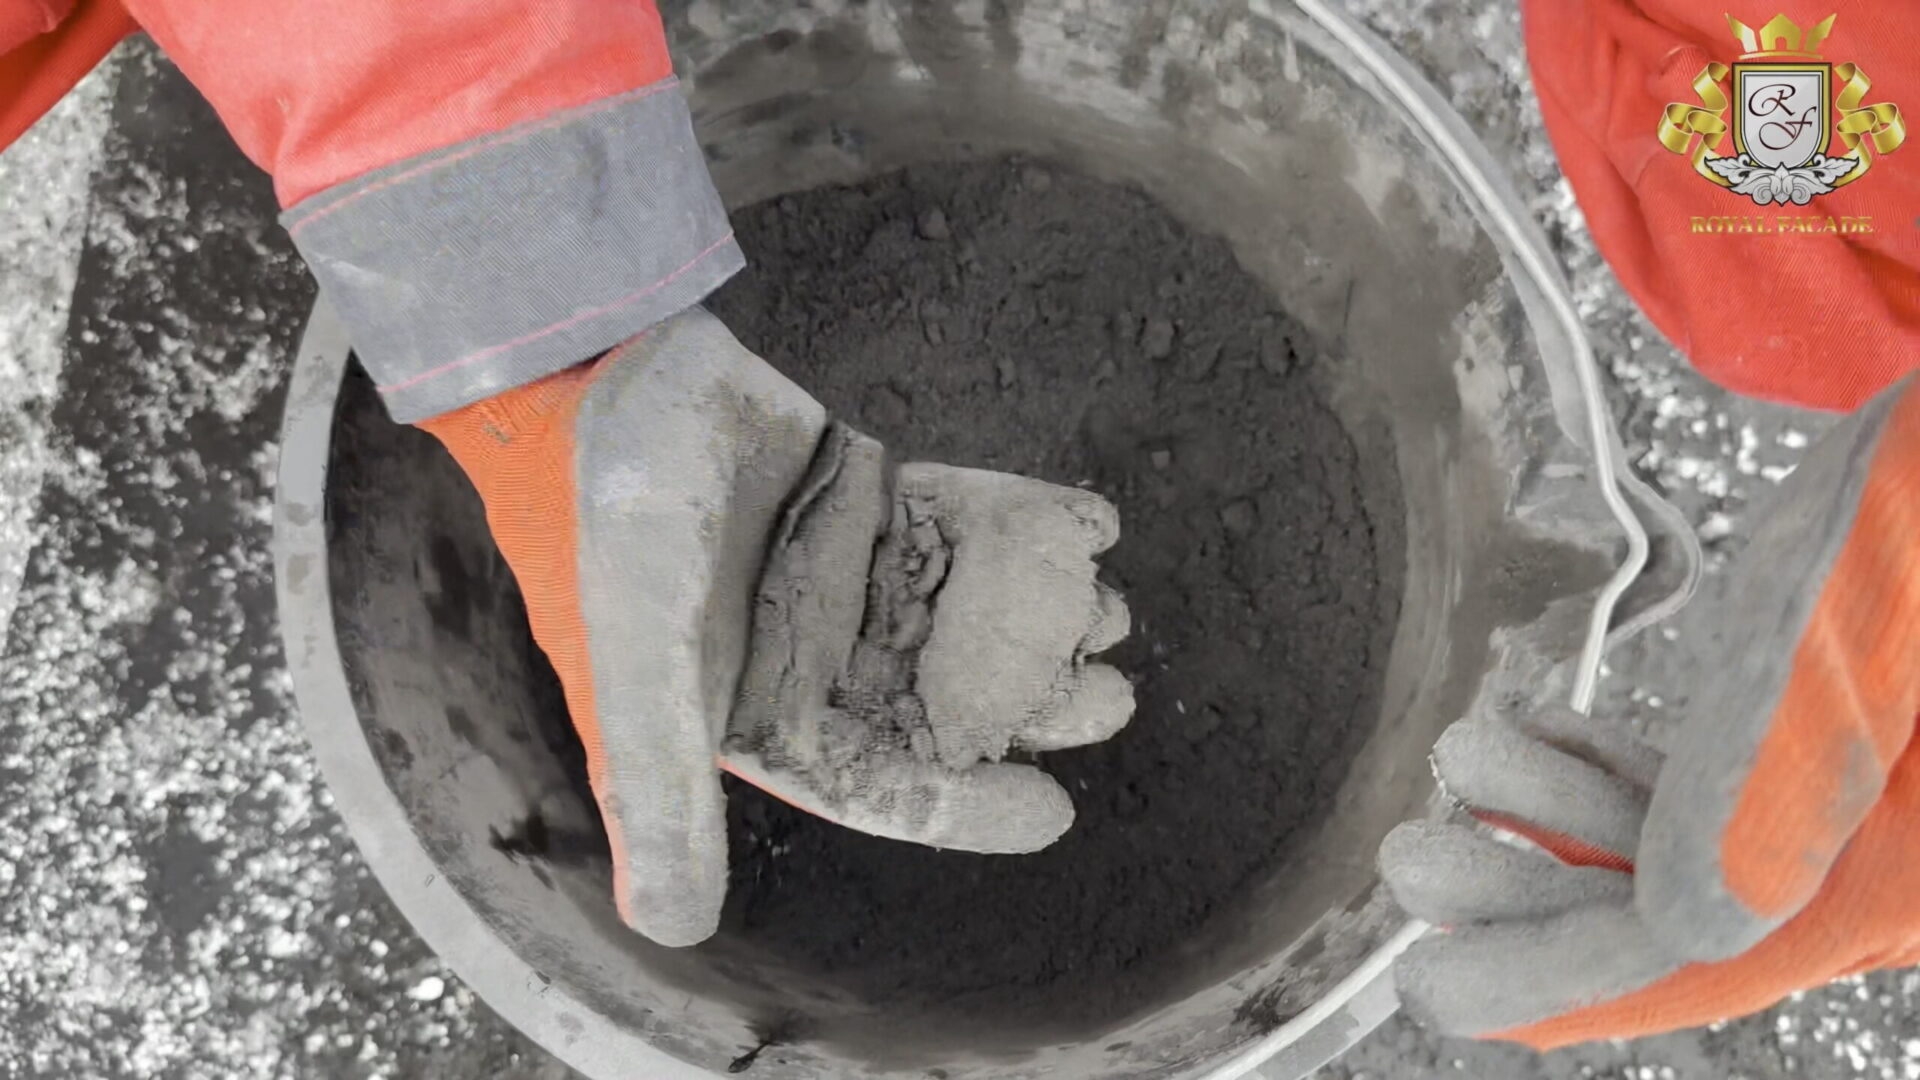
Preparation of the solution
The dry mix is mixed with clean water at room temperature, closer to cool, according to the proportion specified in the technical specifications.
In the case of seasonal temperature fluctuations, it is recommended to use a latex solution instead of water to improve the strength, adhesion, elasticity, moisture resistance, and weather resistance of cementitious grouts. The latex solution also reduces the likelihood of efflorescence, the appearance and growth of mould (fungus, moss). We get a homogeneous plastic mass with a “wet earth” consistency. Add the dry mix gradually to the mortar. Mixing should be done with a mixer or a drill with a nozzle.
Do-it-yourself installation of facade thermal panels is possible only if all instructions and recommendations are followed! Do not mix the mixture “by eye”! This can lead to the appearance of different shades of seams on the facade of your house.
During mixing, prevent foaming by maintaining a technological pause of 5 minutes, then mix again before performing all work. This mixture can be used for no more than 60 minutes. The container should be corrosion-resistant and clean. This also applies to a trowel and other tools.
Preparation of the base
The base of the seam (foamed or extruded polystyrene) is perforated with a special roller (optionally). At the same time, the depth of the seam should be at least 10 mm. If the depth of the seam is less, we recommend using grout with an acrylic solution instead of water (it makes the seam stronger).
The seam is preliminarily cleaned of debris and polystyrene foam residues. If the ambient temperature is high, there is a strong wind or draft, or the clinker strongly absorbs liquid, we recommend wetting the masonry with water, but do not allow the formation of a film on the surface of the clinker.
PLEASE NOTE! If you add different amounts of solution to the grout mixture, as a result, you can get different shades on the facade! Keep in mind – add only equal proportions of water or acrylic to the mixture! Also, try not to mix in different weather (burning sun or high humidity), as this may affect the shade of the inter-tile seams in the future. If it happens that the seams are decorated, and the next day or week the weather changes sharply, it is recommended to cover the facade (where there are finished seams) with polyethylene film until the seams are completely dry and hardened.
In addition, do not add water or acrylic to the solution that was previously used. This will also change the colour of the inter-tile seam! No other foreign impurities and additives should be added to the finished solution!
Application
If the depth of the seam is normal, the solution is applied in two layers “wet on wet”; then pressing is carried out.
Evenly distribute the solution in the seams, which guarantees the uniformity of the texture and colour scheme after the drying and hardening processes take place.
If there are breaks in the grouting, the masonry is covered. It is advisable to protect the seams from drafts, ultraviolet radiation, and frost with polyethylene film, as we mentioned above.
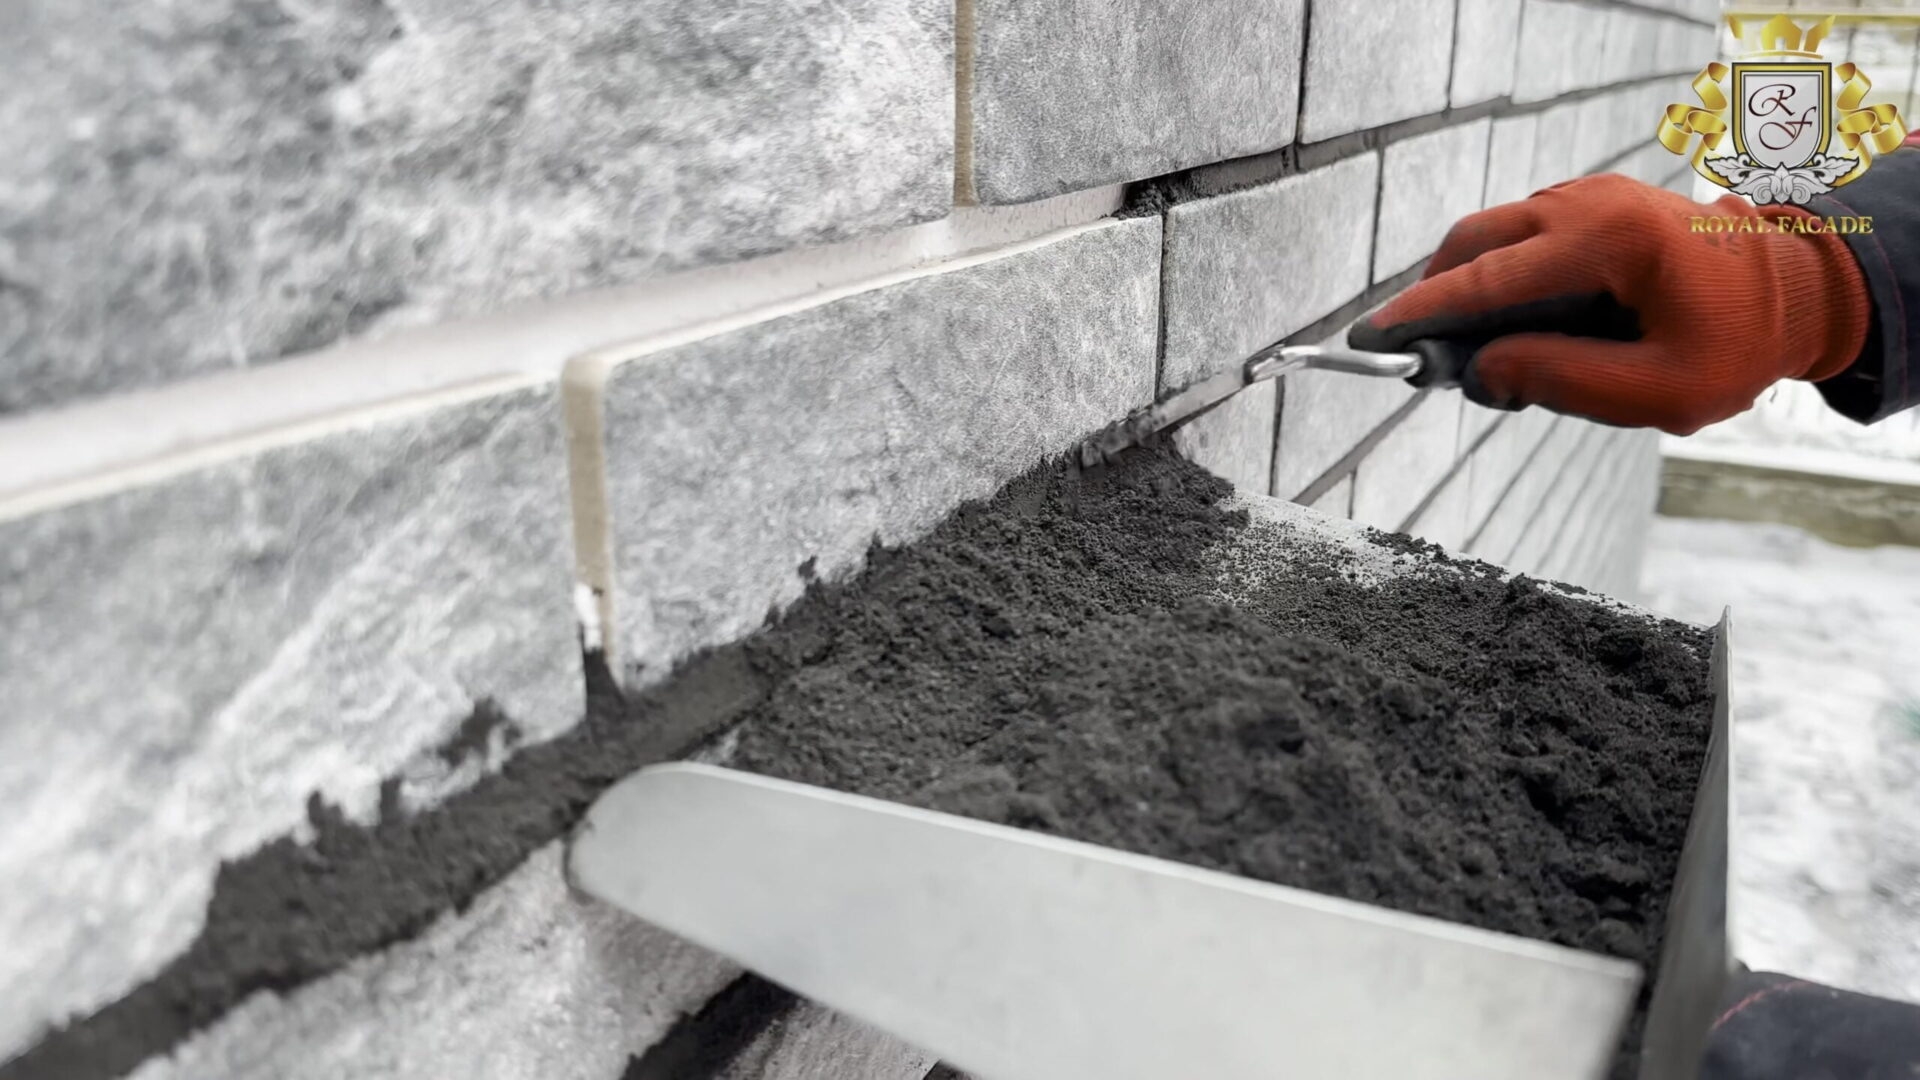
Way 2. Filling seams with a hand gun
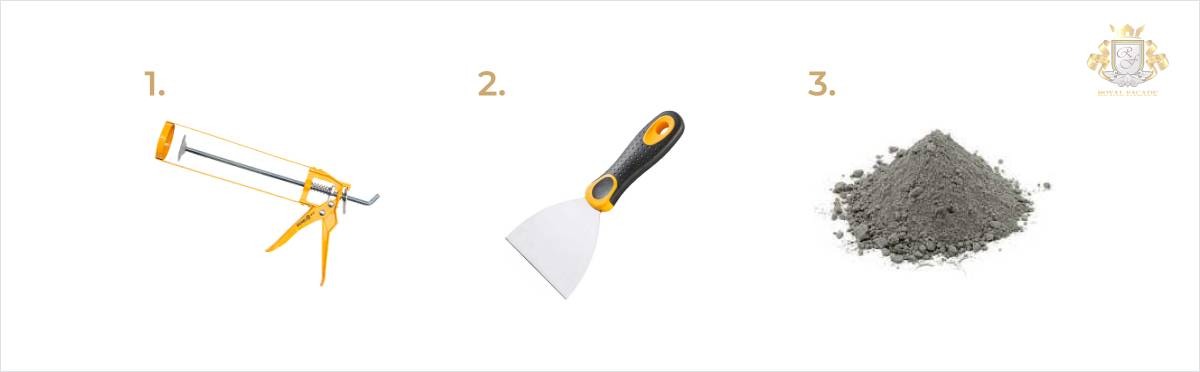
TOOLS AND MATERIALS FOR WORK:
- Gun (with which the mixture is applied (squeezed out)).
- Construction pallet.
- Mixture for filling and pointing seams.
The base of the facade should be prepared in accordance with the requirements of the Ukrainian State Standards ДСТУ-Н БА.3.1-23: 2013 and ДСТУ-Н Б В.2.6-212: 2016.
Check the seams and, if necessary, clean them of polystyrene foam and glue residues.
The seam is preliminarily cleaned of debris and polystyrene foam residues. If the ambient temperature is high, there is a strong wind or draft, or the clinker strongly absorbs liquid, we recommend wetting the masonry with water, but do not allow the formation of a film on the surface of the clinker.
Avoid overdoing the liquid in the mixture, as this can lead to the cracking of the seams and deterioration of the hydrophobic properties of the mixture.
Applying the mixture is carried out using a special hand gun. The mixture should protrude from the seam. In an hour or two, you can already form a seam with a pallet (keep in mind that the mixture should have the consistency of dry sand by this time, and the surface should be completely dry).
The drying process can take approximately 3 hours, depending on the adsorption of the tile base and the ambient temperature. After the mixture dries, its remains should be removed.
Do not add water to the mixture while using it, as this may cause the shade to change.
If you notice that the mobility of the mixture is lost, restore the solution by re-stirring (without adding water).
If the grouting mixture (ready-made solution) got on the tile, in no case it should be immediately removed from the surface. Only after the mixture has completely dried, you can carefully pick up the residue, remove it and wipe it with a dry cloth.
After finishing the work and complete drying, you can wipe the dirty surface with a damp cloth.
PLEASE NOTE! If you add different amounts of solution to the grout mixture, as a result, you can get different shades on the facade! Keep in mind – add only equal proportions of water or acrylic to the mixture! Also, try not to mix in different weather (burning sun or high humidity), as this may affect the shade of the inter-tile seams in the future. If it happens that the seams are decorated, and the next day or week the weather changes sharply, it is recommended to cover the facade (where there are finished seams) with polyethylene film until the seams are completely dry and hardened.

How to remove salt in seams?
If there is a violation of the pointing technology, and as a result, efflorescence appears, you should use the following means:- SikaSikagard-S efflorescence cleaner (You can read the instruction on the package or at the link).
- After removing the salts from the facade, you can treat the inter-tile seams with SikaSikagard-71 W Pro hydrophobic agent.
Download Auxiliary Materials
Technical solutions album of facade thermal panels ™ROYAL FAСADE with clinker tiles
Installation instructions for clinker thermal panels ™ROYAL FACADE
Need professional help?
ROYAL FACADE
Examples of finished projects


- ROYAL FACADE
FAQ
Our company works all over Ukraine. Delivery, installation and
warranty are guaranteed.
*Clinker thermal panels are complex structures designed to decorate the facade, and also serve as an insulating material.
Clinker thermal panels perfectly imitate brickwork. Typically, these products use three material options: polyurethane foam, expanded polystyrene foam or extruded polystyrene. They differ from each other in production technology.
So, for example, a clinker tile is pressed into the foam plastic to a thermal panel with expanded polystyrene using a one-component polyurethane adhesive. The glue penetrates deeply into the structure of the components and its polymerization is carried out. Due to this, a single structure of increased strength is formed: clinker and insulation.
It is important to note that such a design – 3 in 1 – turns out to be an excellent option for replacing a separate insulation (brick).
*We produce thermal panels according to the European technology of multiple pressing, which is more than 50 years old. We use exclusively European certified raw materials (see our test videos). We carry out quality control at every stage of production.
For example, a manufacturer of polyurethane adhesive guarantees its properties for 35 years.
Clinker tiles, in principle, have no service life, tk. this is a natural material – sintered and pressed clay at a temperature of 2000 degrees! And as you know, clay retains its physical properties for thousands of years …
The service life of clinker thermal panels is more than 50 years.
The specialists of our company will calculate the required insulation (in particular, the thickness) based on the requirements of the legislation. By the way, you can see the formula for calculating the thickness of the insulating layer based on energy efficiency standards in the document THERMAL INSULATION OF BUILDINGS DBN V.2.6-31:2006.
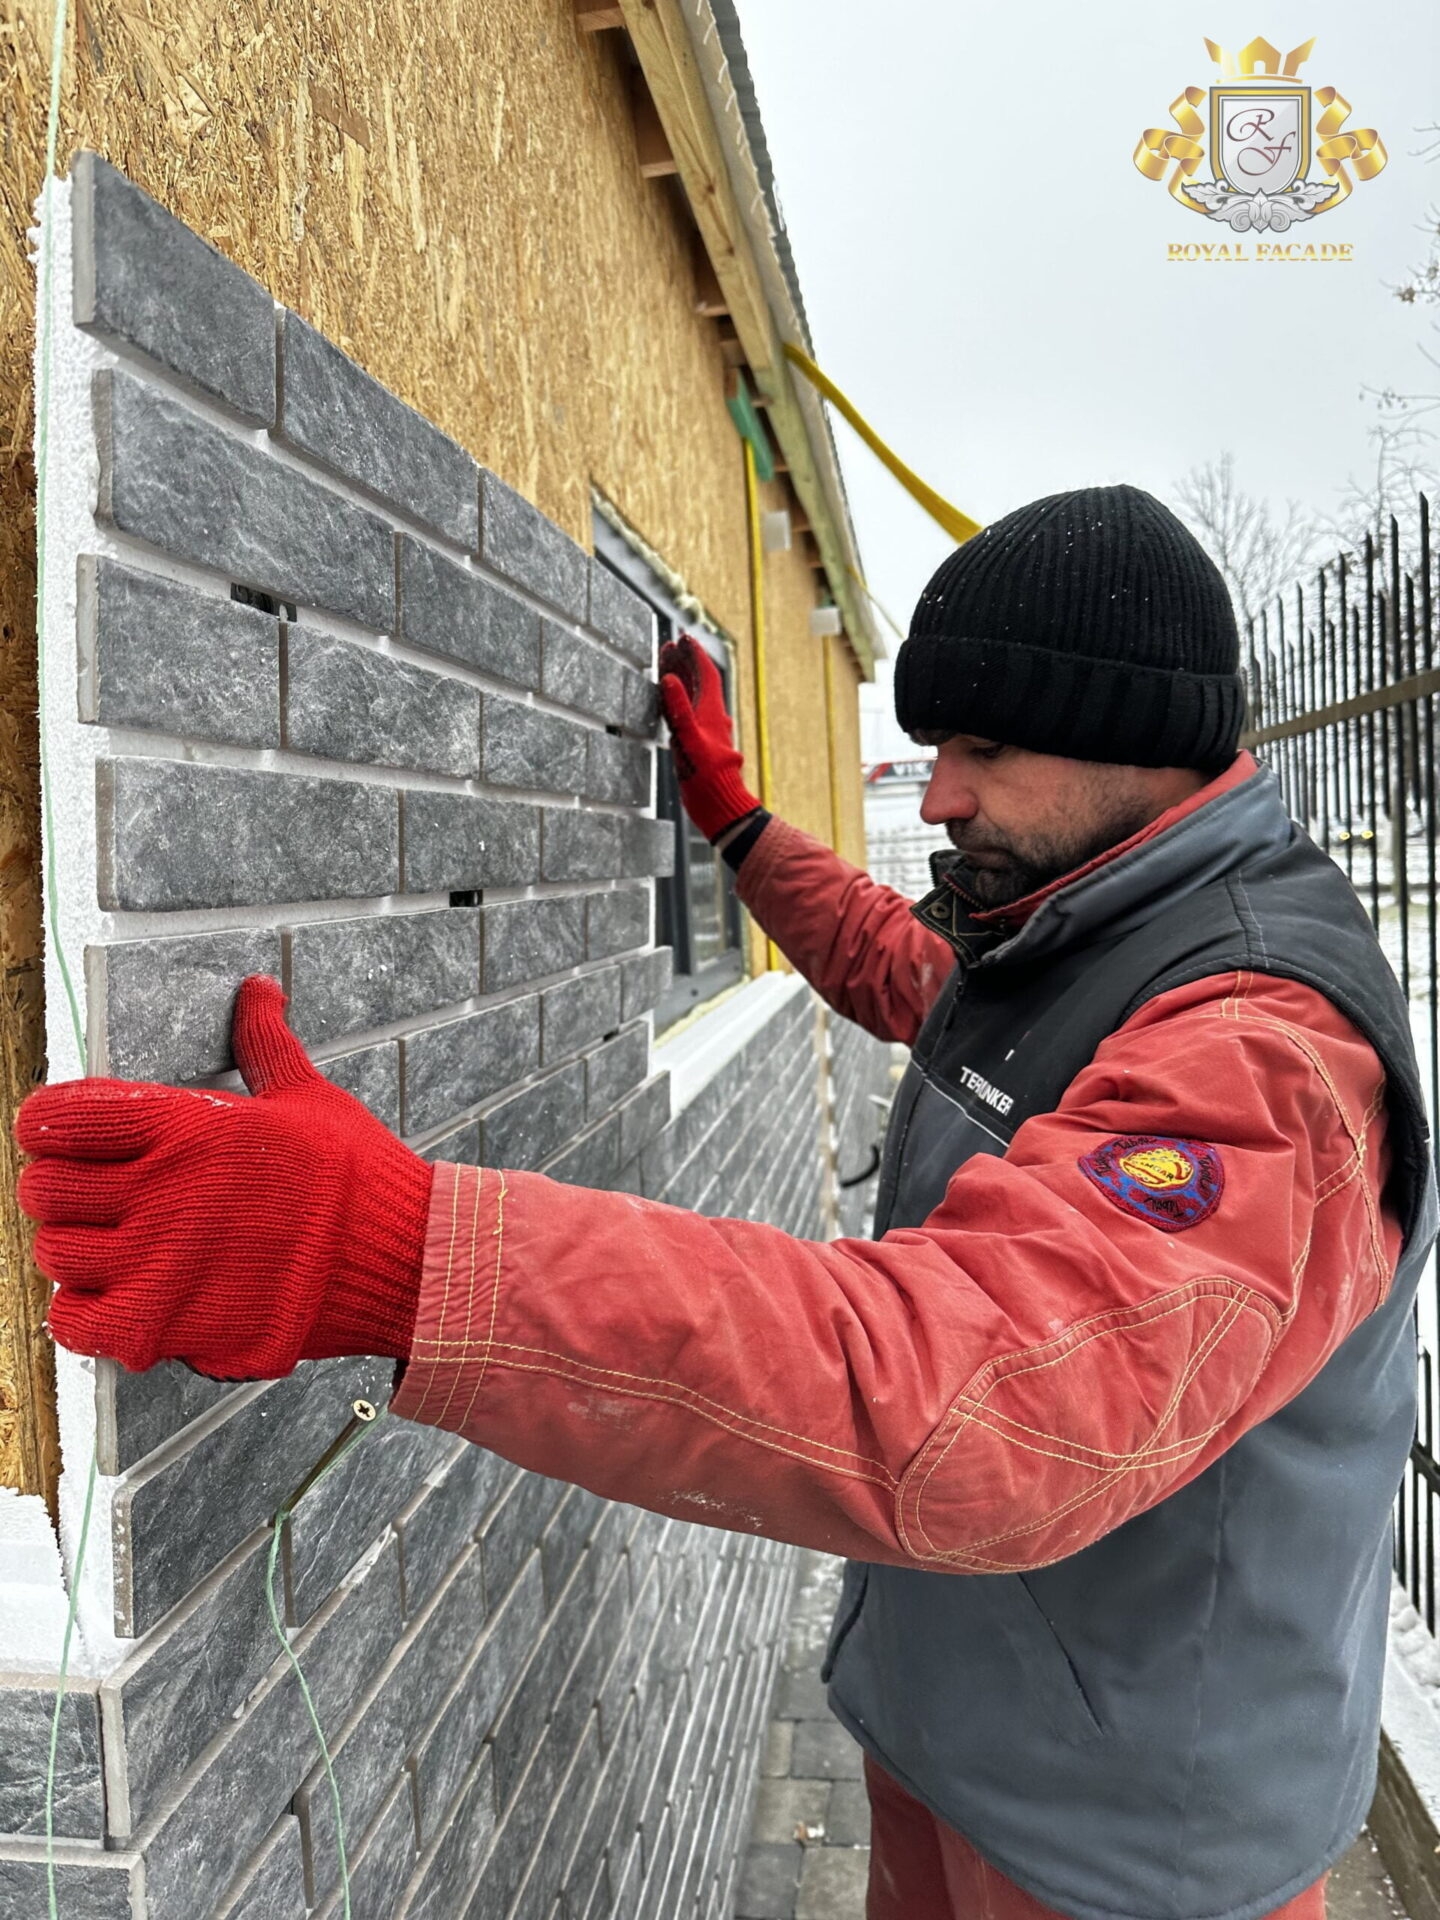
*Thermopanels can be installed at sub-zero temperatures down to -14°C. All-weather installation, both in hot summers and in cold winters, is a distinctive feature of our facade insulation technology, since a special “dry technology” is used.
However, it is not recommended to install clinker thermal panels during precipitation – snow, rain. Grouting is carried out from +5 degrees Celsius. For example, panels can be installed in winter (besides, the price is more affordable in winter), and grouting can be done in spring.
However, it is not recommended to install clinker thermal panels during precipitation – snow, rain. Grouting is carried out from +5 degrees Celsius. For example, panels can be installed in winter (besides, the price is more affordable in winter), and grouting can be done in spring.
*Based on our experience, the cladding is influenced by several factors at once – the type of construction, the object and the ability of specialists. If installers have no experience with thermal panels, then it will take some time to train them. Therefore, we recommend contacting experienced contractors. On average, a team with installation experience of 2-3 specialists will need a month of work (this is a turnkey solution).
If you buy thermal panels from us, then we offer you “supervised installation” – this is the service of the visit of our master, who works with builders throughout the day.